Growing Celery From Seed to Harvest: A Rewarding Beginner's Guide
There’s a unique satisfaction that comes from plucking fresh produce directly from your garden, and celery, with its crisp texture and vibrant flavor, is no exception. Often regarded as a challenging crop, many gardeners, ourselves included when
we grew celery for the first time, were pleasantly surprised to discover that this green stalk can be a remarkably rewarding addition to the home garden, even for beginners. While it demands a bit of patience and an early start, the payoff—fresh, flavorful celery that far surpasses anything you'll find in a grocery store—is absolutely worth the effort.
Dispelling the Myth: Why Celery Isn't as Hard as You Think
Celery has earned a reputation for being a finicky plant, often deterring new gardeners before they even begin. However, much of this reputation stems from the initial hurdle of seed germination. Indeed, getting celery seeds to sprout can be a bit tricky. They are small and require consistent moisture and warmth to successfully germinate, making starting them indoors the preferred method for most. Our own journey confirmed this: we encountered a few early challenges with our seeds, reinforcing the common sentiment that celery germination isn't always straightforward.
But here's the good news: once those delicate seedlings are successfully established and transplanted into the garden, celery transforms into a surprisingly robust and "no-nonsense" plant. It thrives with consistent care and a long growing window, rewarding the diligent gardener with lush, healthy stalks. This slow and steady growth habit is key; celery isn't a race, it's a marathon. By embracing patience and understanding its basic needs, you’ll find celery to be far more approachable than its formidable reputation suggests. For anyone contemplating a new challenge in the garden, we can confidently say that venturing into celery cultivation, as
we grew celery for the first time ourselves, proved to be an incredibly fulfilling experience, securing its permanent place in our garden for years to come.
The Unforgettable Flavor: Homegrown Celery vs. Store-Bought
If you've only ever experienced store-bought celery, prepare for a revelation. The difference in quality between commercially grown and freshly harvested homegrown celery is nothing short of dramatic. From the moment you pick a stalk from your garden, you'll notice a distinct vibrancy. Homegrown stalks snap cleaner, possess an invigoratingly brighter taste, and offer a fuller, more complex flavor profile that simply can't be replicated after days or weeks in transit and on a supermarket shelf. The aroma alone is often enough to convince you – a rich, earthy scent that hints at the vibrant flavor waiting within.
Beyond the stalks, homegrown celery offers another hidden gift: its leaves. These often-discarded greens are packed with an intense, concentrated celery flavor, acting almost like a more robust parsley. They are fantastic additions to soups, stocks, salads, and sautés, adding a depth of flavor that many cooks rarely get to experience. Growing your own celery grants you access to the entire plant, not just the pale, outer stalks. This complete experience is why, once you've tasted fresh-from-the-garden celery, its rich taste and crispness will likely secure its permanent spot in your cool-season garden. You can delve deeper into why
homegrown celery’s flavor beats store-bought every time by exploring the nuances of its freshness and nutrient profile.
Getting Started: From Seed to Transplant
Successfully growing celery begins with a strategic start. Due to its long growing window and the finicky nature of its seeds, starting celery indoors is the most reliable method for home gardeners.
1.
Seed Starting Indoors:
*
Timing is Key: Begin your celery seeds indoors approximately 10-12 weeks before your region's last anticipated frost date. This gives the seedlings ample time to develop strong root systems before being exposed to outdoor conditions.
*
Seed Specifics: Celery seeds are very small and require light to germinate. Sow them shallowly, just barely covering them with a fine layer of seed-starting mix or vermiculite.
*
Moisture and Warmth: Consistent moisture is crucial. Keep the seed-starting mix evenly moist but not waterlogged. A humidity dome can help maintain optimal conditions. Aim for a soil temperature of around 70-75°F (21-24°C) for best germination rates. Heating mats can be incredibly helpful here.
*
Patience: Don't be discouraged if germination seems slow; it can take anywhere from 10 days to 3 weeks for celery seeds to sprout.
2.
Alternative Starting Methods:
*
Nursery Transplants: If starting from seed seems daunting or you're simply short on time, look for celery transplants at your local nursery. This is an excellent way to get a quick start and bypass the germination phase.
*
Regrowing from a Base: A fun and educational project, especially for kids, is to regrow celery from a cut-off base. Simply place the bottom 1-2 inches of a celery stalk in a shallow dish of water in a sunny spot. New growth will emerge from the center, and once roots form, it can be transplanted into soil. While this method yields smaller plants, it’s a wonderful way to observe the plant's growth cycle.
3.
Transplanting Outdoors:
*
Harden Off: Before moving your seedlings or regrown bases outdoors, remember to harden them off gradually over a week or two. This involves exposing them to increasing periods of outdoor conditions (sun, wind, cooler temperatures) to acclimate them.
*
Soil Temperature: Transplant only when the soil temperature has consistently reached at least 50°F (10°C) and all danger of frost has passed.
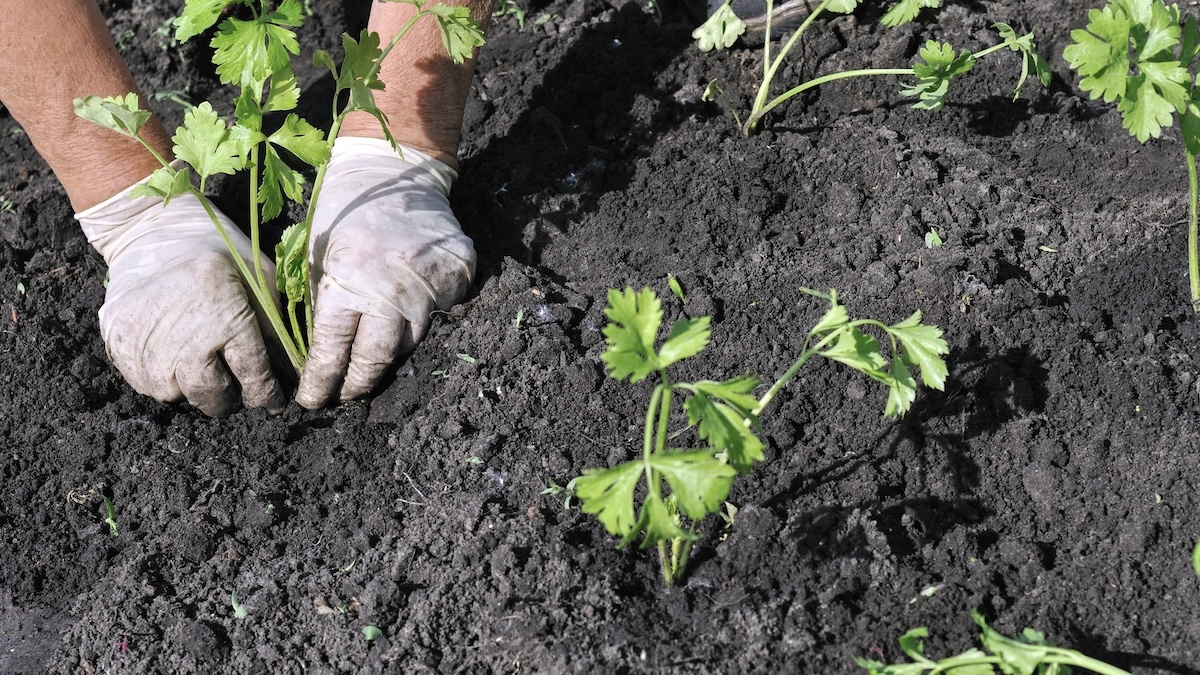
*
Spacing: Plant celery seedlings (or cut-off celery bases) 8-10 inches apart in rows, or if you're using a square foot gardening method, you can plant four celery plants per square foot. Ensure they are planted at the same level as they were in their nursery pots.
*
Location: Celery thrives in full sun (at least 6-8 hours daily) but can tolerate some partial afternoon shade, especially in hotter climates, which can help prevent bolting.
Nurturing Your Celery: Ongoing Care and Harvesting
Once your celery plants are established in the garden, consistent care will ensure a bountiful harvest.
1.
Watering: Celery is a thirsty plant and requires consistent moisture. Irregular watering can lead to stringy, tough stalks or even cause the plant to bolt (go to seed prematurely). Aim for deep, regular watering, especially during dry spells. Mulching around the plants can help retain soil moisture and suppress weeds.
2.
Soil & Nutrients: Celery prefers rich, well-draining soil. Amend your garden beds with plenty of organic matter like compost before planting. Throughout the growing season, a balanced organic fertilizer can be beneficial, particularly one slightly higher in nitrogen to support leafy growth.
3.
Weed Control: Weeds compete with celery for water and nutrients, which can significantly impact your harvest. While life happens and sometimes garden chores get skipped (especially during busy life events!), regular weeding, particularly in the early stages of growth, is vital. A layer of mulch can help suppress weeds significantly.
4.
Blanching (Optional): Some gardeners choose to blanch their celery to produce paler, more tender stalks. This involves covering the lower part of the stalks to block sunlight. You can do this by mounding soil around the base, wrapping cardboard or newspaper, or using blanching collars. This process typically takes 10-14 days before harvest.
5.
Harvesting: One of the most satisfying aspects of growing your own celery is its "cut-and-come-again" harvesting method.
*
Individual Stalks: Instead of pulling the entire plant, you can snip off individual outer stalks as needed. This allows the inner stalks to continue growing, providing multiple harvests from a single plant over an extended period. This makes celery an incredibly efficient and generous crop for the kitchen garden.
*
Whole Plant Harvest: If you prefer to harvest the entire plant, you can do so once the stalks have reached a desirable size, typically when the central stalks are about 6-8 inches tall. Use a sharp knife to cut the plant at the soil line.
*
Timing: Our own experience showed that celery transplanted in mid-May was ready for picking by September, with some plants continuing to produce. This underscores the need for a long growing season.
Celery in Containers: A Bonus Tip
For those with limited garden space, growing celery in containers is entirely feasible! Choose a large pot (at least 10-12 inches deep and wide) with good drainage. Fill it with a high-quality potting mix rich in organic matter. Ensure consistent watering, as container plants tend to dry out faster. Follow the same principles for planting and care, and you can enjoy fresh celery from your patio or balcony.
In conclusion, growing celery from seed to harvest is a garden adventure well worth embarking on. Despite its initial reputation, with a little planning, consistent care, and a dose of patience, you can transform delicate seedlings into crunchy, aromatic stalks bursting with flavor. The unparalleled taste and the ability to harvest repeatedly make homegrown celery a true kitchen garden staple. So, take the leap, experience the joy of cultivating this versatile vegetable, and savor the superior quality that only your own garden can provide.